 Previous | Index | Next Previous | Index | Next 
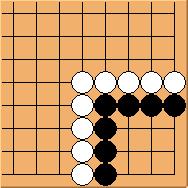
Diagram 1.1: White to play
We will start building our knowledge from this rather unusual shape - stones all the way down to the border lines, probably hard to find in real games.
At first sight, the corner doesn't look secure. What can white do?
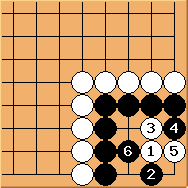
Diagram 1.2: Solution
Note the symmetry in this shape so I will only cover half the possibilities. Clearly  is the only starting point.
This results in a seki. Black can omit the is the only starting point.
This results in a seki. Black can omit the   exchange and play exchange and play  directly
(if white then plays at black can occupy the 1-1 point, forming a different seki). directly
(if white then plays at black can occupy the 1-1 point, forming a different seki).
 can also plays at instead, followed by can also plays at instead, followed by  and ,
reaching the same outcome. and ,
reaching the same outcome.
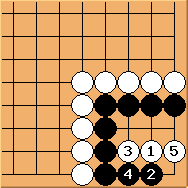
Diagram 1.3: Variation 1
White may choose to play . is the best answer, also resulting in a seki.
After , black can feel free to play tenuki.
There is nothing left white can do in this corner (you may want to verify this would not end up in dead shapes like Bulky Five).
This is clearly in black's favor in comparison to the solution above because black has sente now.
Responding at 5 after would be incorrect - a ko is then inevitable (either a 10000-year ko or a multi-stage ko).
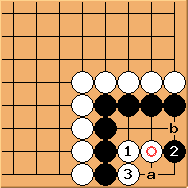
Diagram 1.4: Variation 2
The corner is amazingly resilient. Even if black plays tenuki in response to the 2-2 attack, white cannot kill it.
The variation shows just one possible continuation. is the key point, resulting in a ko.
If plays 'a' instead, black 'b' would results in a seki - a horrible results for white,
after spending two extra moves in the corner.
Previous | Index | Next
|