 Previous | Index | Next Previous | Index | Next 
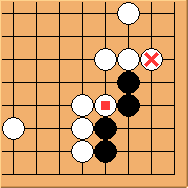
Diagram 21.1: Black to play
Let us discuss this corner shape seemingly weakened by  .
Suppose white just plays .
Suppose white just plays  , how can black respond? , how can black respond?
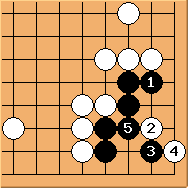
Diagram 21.2: White fails
 is incorrect, but is incorrect, but  is wrong too. is wrong too.
 is the key point and black is alive. is the key point and black is alive.
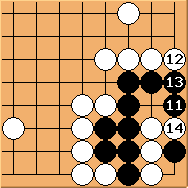
Diagram 21.3: Black fails
occupies the key point instead.
is the most tricky answer (clearly  or or  not working).
Although not working).
Although  is a good move (a common tesuji to avoid those big-eye killing shapes), it doesn't work here...... is a good move (a common tesuji to avoid those big-eye killing shapes), it doesn't work here......
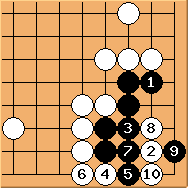
Diagram 21.3: Black fails (continued)
 is a calm move. Black is killed. is a calm move. Black is killed.
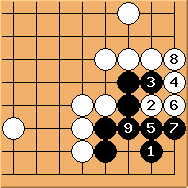
Diagram 21.4: Solution
It becomes clear now that is the key point.
If white plays , black has a number of forcing moves, followed by .
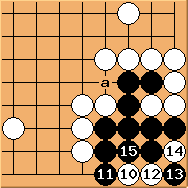
Diagram 21.5: Solution (continued)
 can be a tesuji sometimes. But because of the external liberty at 'a',
black can use Oshi-tsubushi tesuji to kill the white stones. can be a tesuji sometimes. But because of the external liberty at 'a',
black can use Oshi-tsubushi tesuji to kill the white stones.
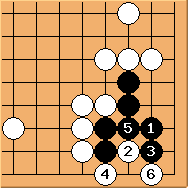
Diagram 21.6: Black fails
also looks like a key point, but so is .
If black chooses  , white can form almost a picnic ko. Black clearly fails. , white can form almost a picnic ko. Black clearly fails.
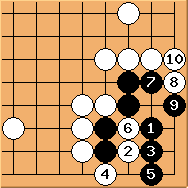
Diagram 21.7: Black fails too
here is better.
After there is just enough room for black to make two eyes.
Black is successful in a pure life & death sense.
But comparing to Diagram 21.4, black is almost 10 points worse off so I cannot accept this as an alternative solution.
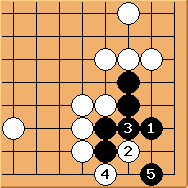
Diagram 21.8: White fails
is slightly more challenging.  is incorrect.
Black can play and the corner is completely alive. is incorrect.
Black can play and the corner is completely alive.

Diagram 21.9: Same as Diagram 21.6
Apparently is the key point. This results the same as Diagram 21.6.
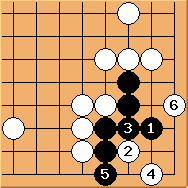
Diagram 21.10: Black fails
doesn't work and the corner is killed by  . .
Conclusion: Diagram 21.4 is the only right solution.
Luckily it is not hard to memorise that:
is almost always the key point for Carpenter's Square shapes.
Previous | Index | Next
|