 Previous | Index | Next Previous | Index | Next 
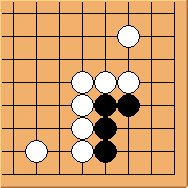
Diagram 23.1: White to play
Let's study this 'incomplete' Carpenter's Square.
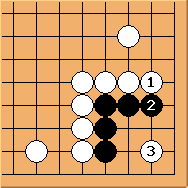
Diagram 23.2: Benchmark
We will use this diagram as a benchmark. We already know this corner
should result in a direct ko (Diagram 2.2 and Diagram 3.5). Can white
find anything better?
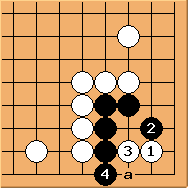
Diagram 23.3: 2-2 not key point
Unlike many other carpenter's square shapes,  here is not a good move.
After here is not a good move.
After  / / exchage, exchage,
 is good ('a' would be suicidal because it reduces the eyespace).
White has two options from here ...... is good ('a' would be suicidal because it reduces the eyespace).
White has two options from here ......
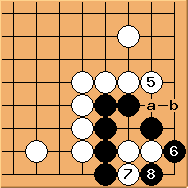
Diagram 23.4: A direct ko
If white plays  , black can form a ko easily after , black can form a ko easily after  .
If .
If  plays instead,
black would make 'a'/'b' exchage first before playing - which is a seki. plays instead,
black would make 'a'/'b' exchage first before playing - which is a seki.
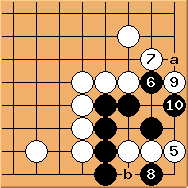
Diagram 23.5: A direct ko
If white plays here instead,
black makes  / exchage before playing
(the familiar tesuji to avoid large-eye killing shapes).
Note the result here is a direct ko after / exchage before playing
(the familiar tesuji to avoid large-eye killing shapes).
Note the result here is a direct ko after  - if black forces white to connect at 'a', black can then play 'b' to
get a seki shape while continue to fight the ko.
So it looks like in Diagram 23.3 is no better than the benchmark case.
- if black forces white to connect at 'a', black can then play 'b' to
get a seki shape while continue to fight the ko.
So it looks like in Diagram 23.3 is no better than the benchmark case.
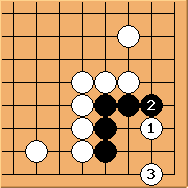
Diagram 23.6: Solution, but...
is the vital point in this shape.
is a related tesuji.
The purpose of is to make an eye in the corner to form Eye versus No Eye capturing
race. However, one needs be careful to implement this idea correctly.
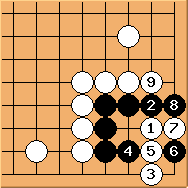
Diagram 23.7: Incorrect sequence
This is the solution given in Cho Chikun's Life & Death
Dictionary. What presented here is that white can win this capturing
race by one liberty. But something appears to be wrong here ......
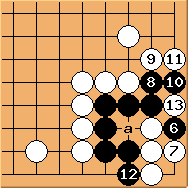
Diagram 23.8: Approach ko
Normally is the previous diagram is the tesuji, but here is better.
can create a ko this way.
This is an approach ko - black need to win the ko and play 'a' to make it a directly ko.
But any way, this is better than dead.

Diagram 23.9: Solution (continued)
It turns out that in Diagram 23.7 is not accurate.
here instead would be flawless.
If plays first, the result is exactly the same.
If plays , the corner is a Pyramid Four dead shape.
Black is dead unconditionally.
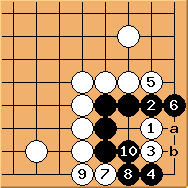
Diagram 23.10: White fails (11=a; 12=b)
If white misses the tesuji in the solution, for example,
if white plays here instead,
black occupies the key point and a ko fight is inevitable.
For example, the sequence here results in an approach ko.
I will leave the readers to work out other variations in this diagram
and we will revisit this in the next article in this series.
To summarise: Diagram 23.6 + 23.9 is the only solution.
White needs to play very accurately to avoid ko fights.
Previous | Index | Next
|