 Previous | Index | Next Previous | Index | Next 
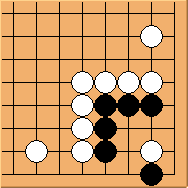
Diagram 3.1: White to play
Following the previous article, we will discuss alternative ways for white to attack the corner.
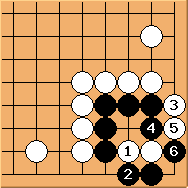
Diagram 3.2: Solution 1b
White may make   exchange first before playing hane at exchange first before playing hane at  .
The following sequence is the same as in Solution 1 as shown in Shape 2
(so I call it Solution 1b). The extra exchange makes little difference in practice, but it may help confuse black...... .
The following sequence is the same as in Solution 1 as shown in Shape 2
(so I call it Solution 1b). The extra exchange makes little difference in practice, but it may help confuse black......
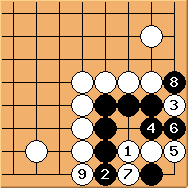
Diagram 3.3: Black fails
in this diagram is wrong!
Now  is possible and white has room to form an eye at is possible and white has room to form an eye at  .
As we will see again and again later, forming an eye inside the corner
is one of the most effective ways to kill a carpenter's square. .
As we will see again and again later, forming an eye inside the corner
is one of the most effective ways to kill a carpenter's square.
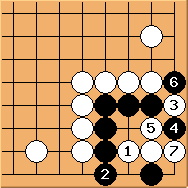
Diagram 3.4: Black fails
 doesn't work either. Remember this shape - this is a typical Bulky Five shape and we will meet it again and again. doesn't work either. Remember this shape - this is a typical Bulky Five shape and we will meet it again and again.
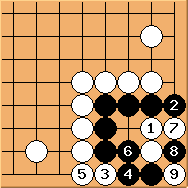
Diagram 3.5: Solution 2
is an alternative way to attack the corner.
Now black must play and we are on an one lane road.
Note that is important.
If changing the position of and  the corner would be a seki. the corner would be a seki.
In some other tutorials (including the diagram I prepared for the Chinese version of this article many years ago),
exchange is missing.
That does not change the ko result but has big practical differences!
With exchange, when white wins the ko fight, he can only connect at 8 to form a Bulky Five to kill; Without exchange, white can take at 4 to settle the ko nicely with no aji left.
The latter is much much better than the former. This is because a dead group with big eye still has a lot of liberties.
In case white's surrounding is not as strong, there is a chance that black can drag white into a capturing race.
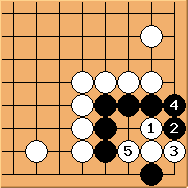
Diagram 3.6: Black fails
hane doesn't work. See that Bulky Five again?
Now it is time to summarise. White has both Solution 1 (in Diagram 2.2, Shape 2) and Solution 2 (Diagram 3.5) to start a ko fight.
Which one should white choose? There are three factors to influence the decision:
1. Solution 1 will work even the carpenter's square has one extra liberty.
That's not the case in Solution 2 (black can play the 3-3 point to live if there is an external liberty).
2. Solution 2 has the benefit that even white loses the ko fight eventually,
there are no big yose left for black. So white's stake on the ko fight is slightly smaller.
3. To repeat what we've discussed above, if white is not strong enough outside,
using Solution 2 could be more troublesome because of the potential capturing race.
Previous | Index | Next
|