 Previous | Index | Next Previous | Index | Next 
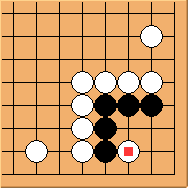
Diagram 6.1: Alternative attack
 is an alternative to the 2-2 attack. However this only works if the
black group has no external liberties. This reason will become very clear later.
is an alternative to the 2-2 attack. However this only works if the
black group has no external liberties. This reason will become very clear later.
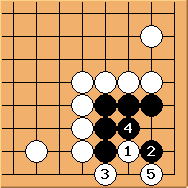
Diagram 6.2: Solution 1
 has no choice. has no choice.
 and and  create a ko fight easily. create a ko fight easily.
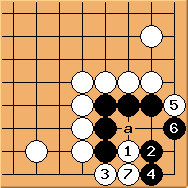
Diagram 6.3: Black fails
 wants to avoid the ko fight but that is not possible.
After wants to avoid the ko fight but that is not possible.
After  exchange, exchange,
 kills the corner because black cannot play at 'a'.
This won't work for white if black has an extra liberty outside. kills the corner because black cannot play at 'a'.
This won't work for white if black has an extra liberty outside.
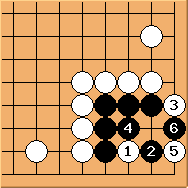
Diagram 6.4: Solution 2 (better)
is a different way to start ko fight.
is very calm and only this guarantees a ko fight. This ko is better for
white than that in Solution 1 for two reasons: (1) white takes ko first;
(2) white would take everything if winning the ko leaving no aji
(in Solution 1, if white wins the ko there are two big ko threats left
for black to use in the future).
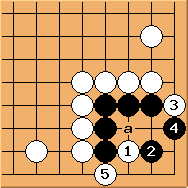
Diagram 6.5: Black fails
is a mistake.
After black again cannot play 'a' so the corner is dead.
This would not work for white if black has one liberty outside.
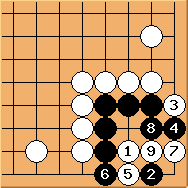
Diagram 6.6: Black fails
wants to try something fancy but this doesn't work.
is a good move, followed by a number of forcing moves.
White ends up having an eye in the corner so black is dead.
could play  first but the result would be the same. first but the result would be the same.
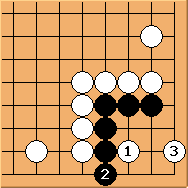
Diagram 6.7: Black fails too
doesn't work as forms an eye easily.
To summarise: Diagram 6.4 is the best sequence for both sides.
For white, in terms of aji, this ko fight also compares favorably to the one in Diagram 3.5 in Shape 3.
So this should be the recommended way to start a ko fight for Carpenter's Square without external liberties.
Previous | Index | Next
|