 Previous | Index | Next Previous | Index | Next 
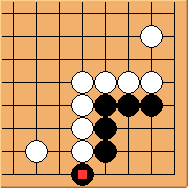
Diagram 7.1: White to play
Black has one extra stone at  . Does it help? . Does it help?
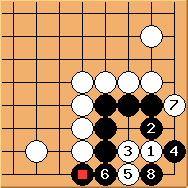
Diagram 7.2: Solution 1
 is still the key point.
It is possible for black to play is still the key point.
It is possible for black to play  now because with
there black has the leisure to play now because with
there black has the leisure to play  . This results in a ko fight.
I recommend this sequence to beginners as moves here look straight-forward and easy to understand. . This results in a ko fight.
I recommend this sequence to beginners as moves here look straight-forward and easy to understand.
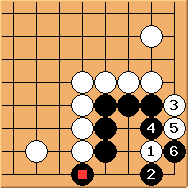
Diagram 7.3: Solution 2
If attaches from the bottom side,
white can use this standard sequence (explained in Diagram 2.2 in Shape 2).
It doesn't feel right as black does not make use of in any way,
although this result is probably no worse than Solution 1.
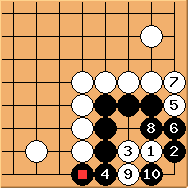
Diagram 7.4: Solution 3
Black can also attach from the other side.
is an important move, preventing white from playing there to reduce the eyespace.
The resulting ko is similar to that shown in Diagram 3.5 in Shape 3.
Again does not seem to contribute anything.
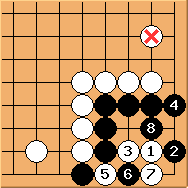
Diagram 7.5: Solution 4
Black may also attempt to improve the eyespace at .
As mentioned  is the key point.
Black has to form an eye at is the key point.
Black has to form an eye at  to avoid Bulky Five, leaving a ko fight. Some sources (such as Chen
Zhigang's article in Weiqi Tiandi magazine) argue that this ko fight is
less favourable for black, probably because black eventually has to fill
in the corner twice to avoid seki after winning the ko. However, note
that the
to avoid Bulky Five, leaving a ko fight. Some sources (such as Chen
Zhigang's article in Weiqi Tiandi magazine) argue that this ko fight is
less favourable for black, probably because black eventually has to fill
in the corner twice to avoid seki after winning the ko. However, note
that the  stone is not necessarily there in real games, so it may not be easy for
white the seal the group from that side (in Solution 3 white has
already got that side sealed with
stone is not necessarily there in real games, so it may not be easy for
white the seal the group from that side (in Solution 3 white has
already got that side sealed with  ). ).
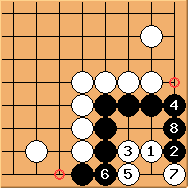
Diagram 7.6: White fails
If white misses the key points ( in previous diagram), the results would be much worse.
This is so-called 10000-year ko. With two extra liberties at  white has little hope to start a ko and is more likely to settle in seki.
To summarise, surprisingly for black the extra hane helps very little. Ko is still the normal outcome.
Previous | Index | Next
|